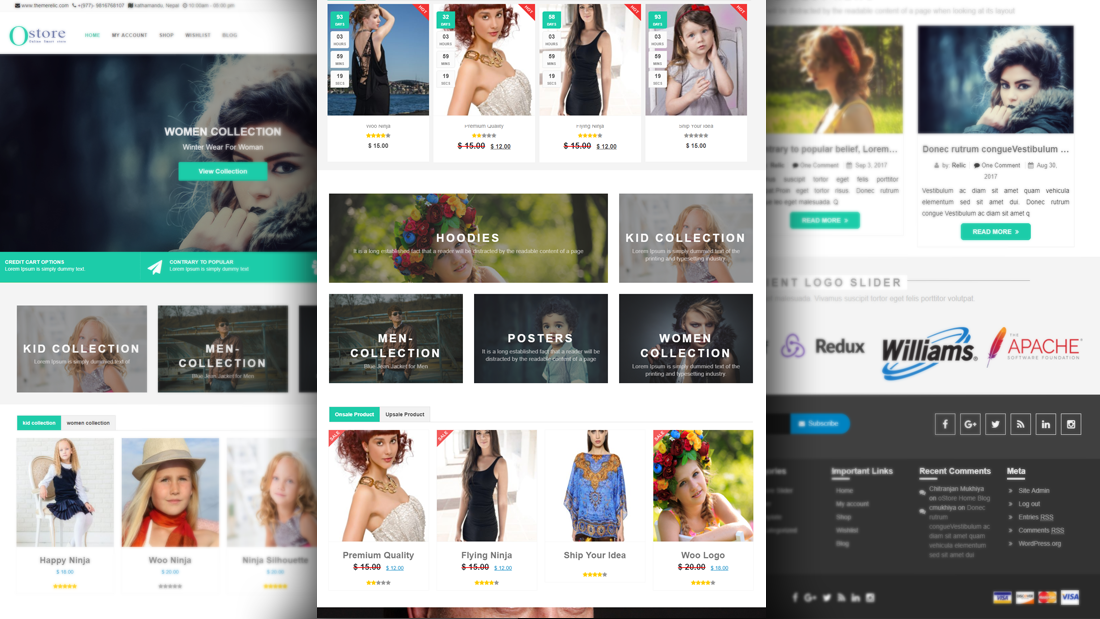
oStore WordPress Theme
Woo Commerce Theme
Note : First Step Configer WooCommerce >> Settings >> Product >> Display Catalog Images/Product Image Recommended Stander Size (275x335)
- created: 08/02/2017
- latest update: 09/20/2017
- by: Theme Relic
- themerelic.com/
- email: themerelic@gmail.com
Theme Instllation
There are two methods to install oStore Wordpress Theme. You may either upload the zipped theme file using the WordPress theme installer (Recommended), or you can upload the unzipped theme folder via FTP (Advanced).
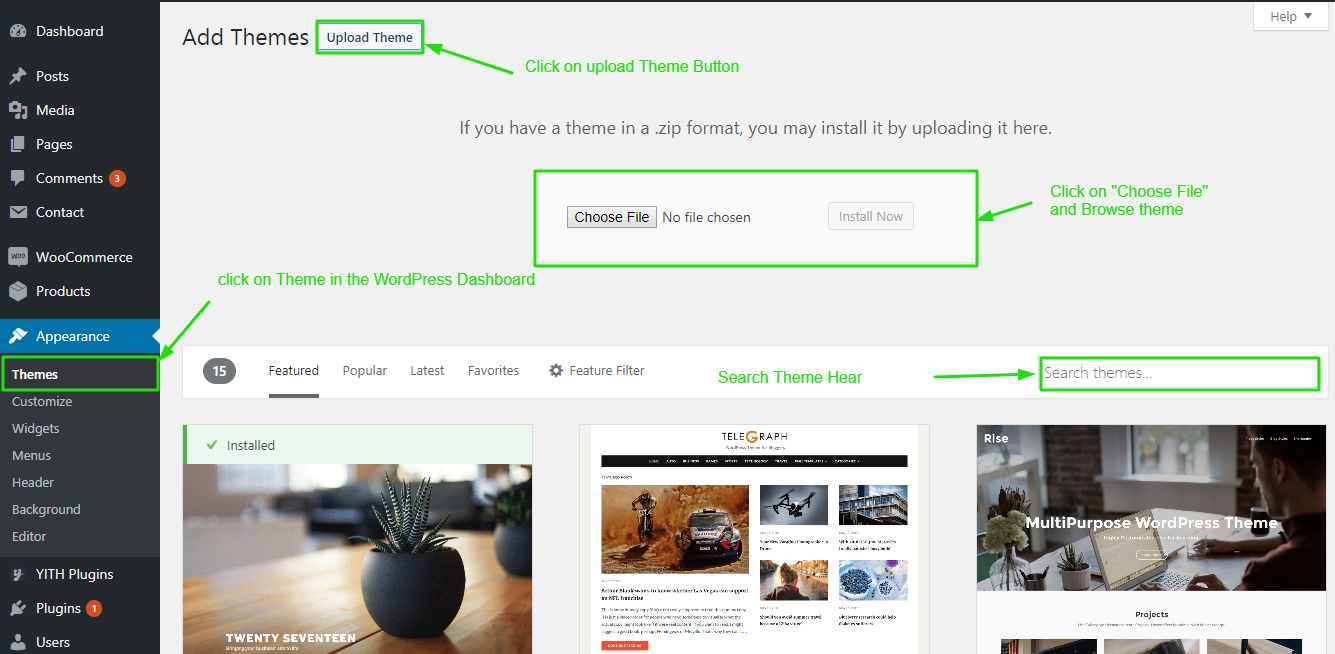
Method 1 ( Recommended): Install Using the WordPress Theme Installer
- Log into your WordPress site and opens the Admin Panel.
- Go to Appearance > Themes in the WordPress Dashboard.
- Click on the Add New button.
- Search for the oStore
- Select the oStore theme
- Click Install Now
Method 2: Install Using File Transfer Protocol (FTP)
- Unzip “oS.zip” file on your computer.
- Login using FTP client to access your host web server.
- Locate the wp-content folder in your WordPress install files.
- Upload the un-zipped oStore folder into the: wp-content/themes folder.
Activate the theme
- Log in to the WordPress Admin Panel.
- Go to Appearance > Themes in the WordPress menu
- Hover over the theme thumbnail and click the Activate button.
Additional information : WordPress Codex – Using Themes
Installing Plugins
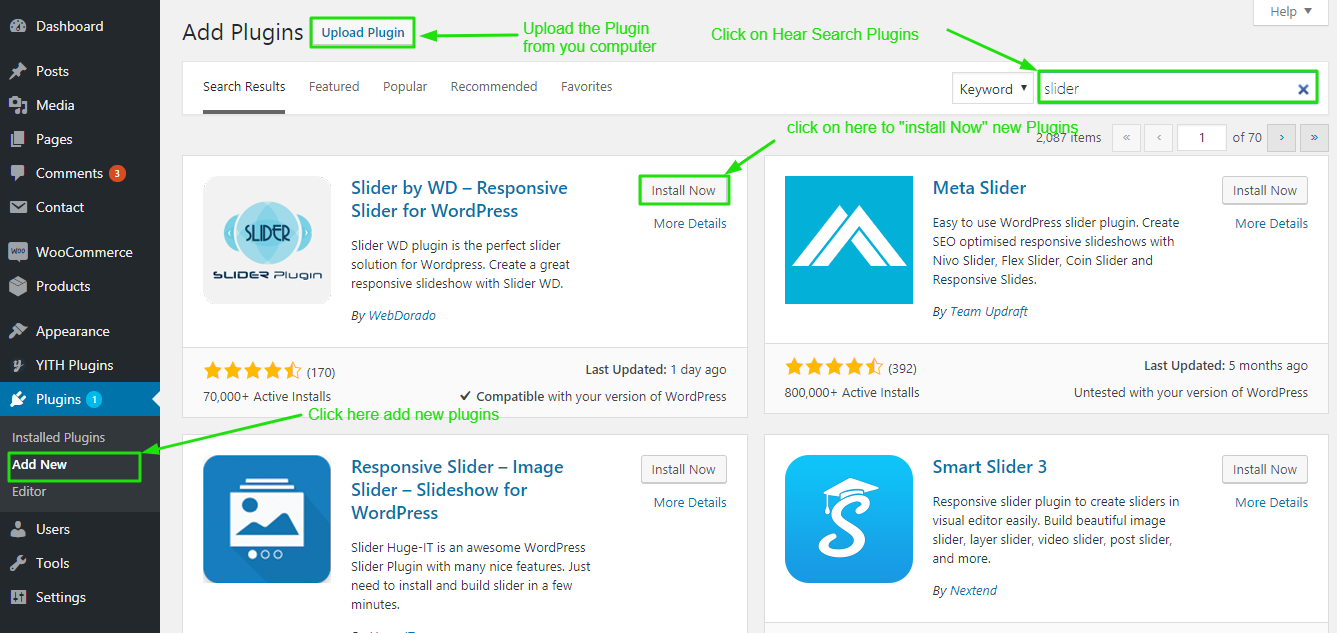
Plugin Installing Method
- Log into your WordPress site and opens the Admin Panel.
- Click Navigate to Plugins > Add New in the WordPress Dashboard.
- Search for the name of the plugin you wish to install which will return a list of potential plugins.
- Click Details to read more about a plugin.
- Click “Install Now” if you wish to install the plugin.
- It may ask if you are sure, and you may proceed. The installation will commence once you confirm to proceed.
- After the plugin is downloaded. Go to Plugins>Installed Plugins. Click “Activate Plugin” to make it available for use.
Recommended Plugins : We recommend you to download the following plugins when necessary:
- WooCommerce by woocommerce.com, by: Automattic (The most customizable eCommerce platform for building your online siness. Get started today for free.)
- YITH WooCommerce Quick View by yithemes.com, by: YITHEMES (This plugin adds the possibility to have a quick preview of the products right from product list)
- YITH WooCommerce Compare by yithemes.com, by: YITHEMES (YITH WooCommerce Compare allows you to compare more products of your shop in one complete table.)
- YITH WooCommerce Wishlist by yithemes.com, by: YITHEMES (YITH WooCommerce Wishlist add all Wishlist features to your website. )
- MailChimp for WordPress by ibericode, by: ibericode (Adding sign-up methods for your MailChimp lists to your WordPress site should be easy. With this plugin, it finally is. )
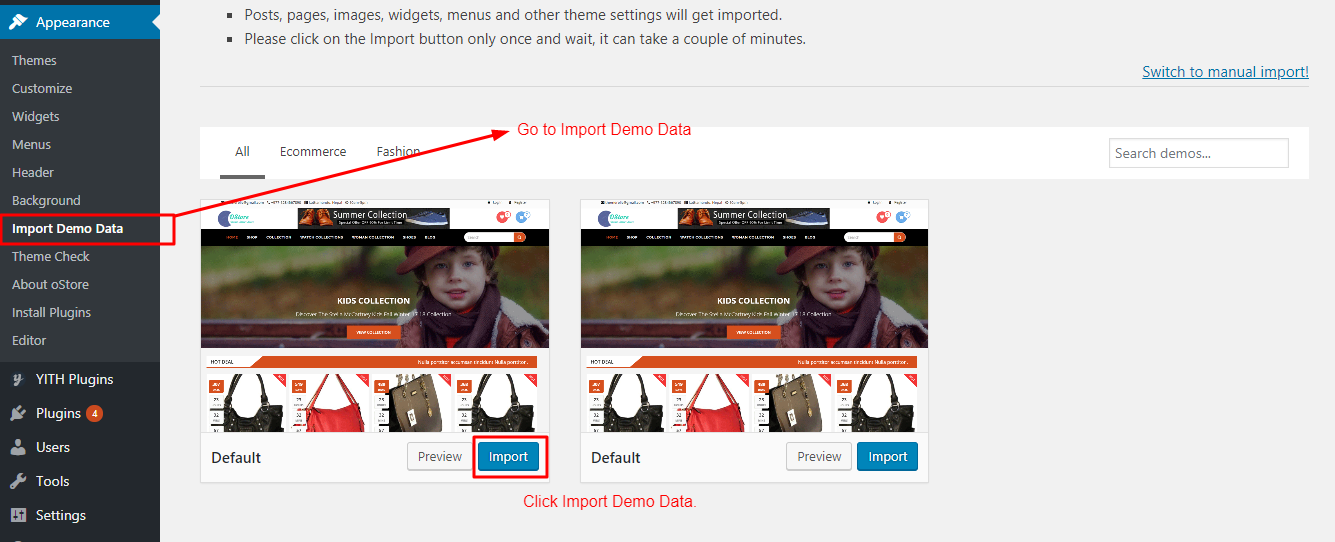
Demo Import
Plugin Installing Method
-
Note: First Install One Click Demo Import Plugin. Then only show this customzer submenu.
- Log into your WordPress site and opens the Admin Panel.
- Go to Dashboard > Appearance > Import Demo Data.
- Select the demo click on import button.Then wait few min. then import all demo data in your theme..
Header Setting
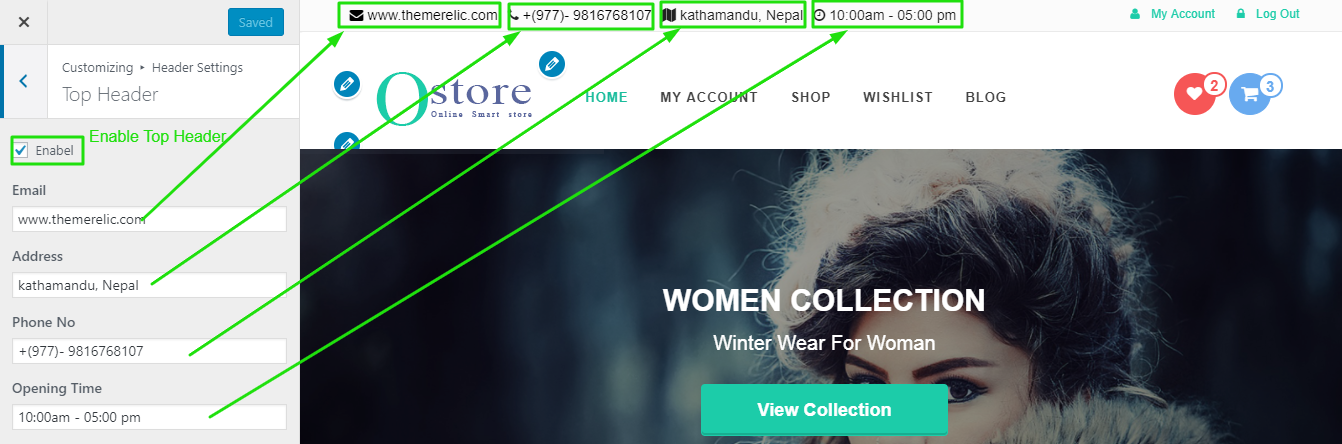
Top Header Setting
- Log into your WordPress site and opens the Admin Panel.
- Go to Dashboard > Appearance > Customize
- Open > Header Settings > Top Header
- Click On Check Box Enable Top Header.
- Fill The Contact Info Email, Address, Phone No and Opening Time
- Click Save & Publish.
General Settings
Logo/Site Title/Favicon (To set up Site Identity)
- Go to Appearance> Customize > General Settings > Site Identity
- Click Select logo by clicking Select Logo.
- Upload and select the desired image.
- Enter the Site Title and Tagline
- Check Display Header Text for the Site title and Tagline to appear on your homepage.
- Click Select Image under Site Icon
- Upload and select the desired image. (The Site Icon/ favicon is used as a browser and app icon for your site. The recommended Site Icon size is 512*512 pixels.)
- Click Save & Publish.
Colors
- Go to Appearance > Customize > General Settings > Colors
- Change the Background Color or Site Title & Tagline Color by clicking on the respective Select Color button
- Click Save & Publish.
Background Image
- Go to Appearance > Customize > General Settings > Background Image
- Click Select Image.
- Upload and Select a Background Image & Manage the image position & other settings
- Click Save & Publish.
To set the Header Image
- Go to Appearance > Customize > General Settings > Header Image
- Upload the header image from the Add new image button. After selecting the header image, it will ask you to crop. If you like to crop it, then, you can crop else leave it as you want for your site to best suit it.
- Click Save & Publish.
Custom Menu
By default, the menus will fallback to Pages. That means just after activation of the theme, you will see all the pages as menus. If you want selective menus with combination of links, pages, categories then custom menu is what you should be looking for.
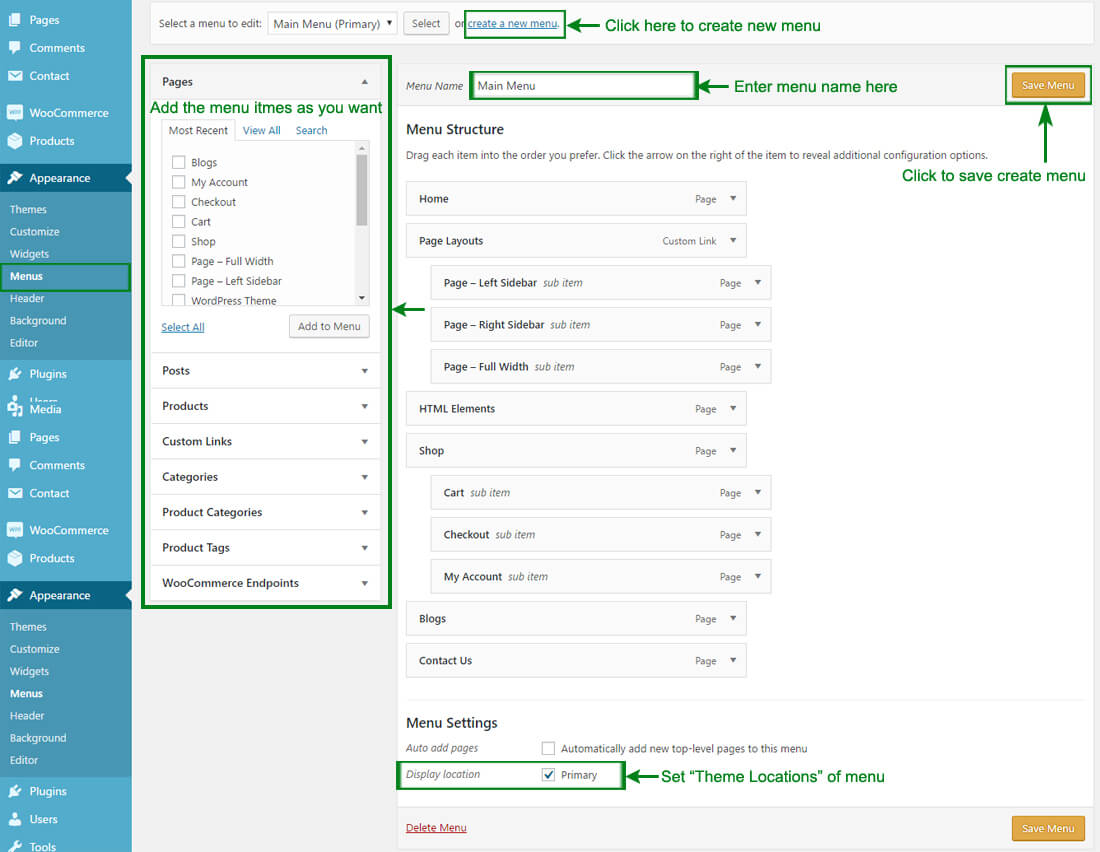
Set up Custom Menu
- Log into your WordPress site and opens the Admin Panel.
- Go to Appearance > Menus in the WordPress menu
- Click on Create a new menu link
- Give a name to your menu in Menu Name and click Create Menu button
- Now choose the pages, categories, custom links from the left side of your screen by selecting the checkbox and click on Add Menu
- Choose the menu Theme Location per as requirement.
- Click Save Menu after adding required pages, categories in the menu
Additional information: WordPress Custom Menu
Home Slider Settings
Add New Home Page Slider
- Log into your WordPress site and opens the Admin Panel.
- First of all, create a post for slider And Set the
- Add the Slider Title, Short Description
- Add the New Category Slider
- Set the Featured Image (width:1300px and Height: 500px,600px)
All Slider Image Size is Same
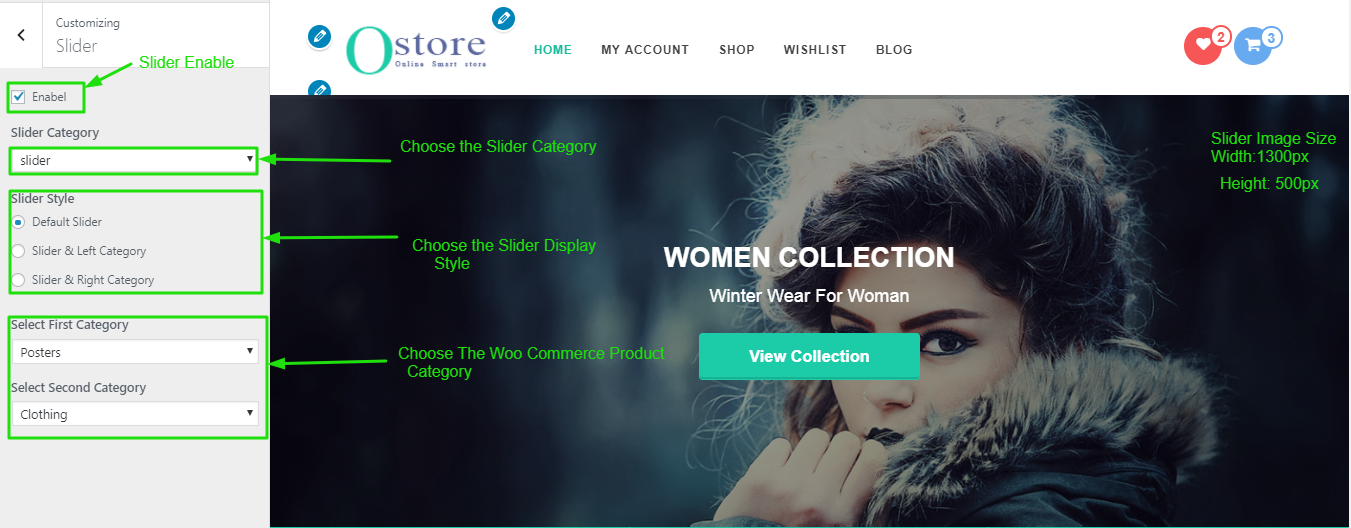
Configure Slider Section
- After Create Slider Post Then Go to Admin Panel.
- Go To Customizer > Slider
- Click On Check Box Enable Slider Show
- Then Select Slider Category
- Slider Style Show Different- Different Layout.
- Select WooCommerce Category Display Slider and Category
- Click Save > Publish.
Home Page Settings
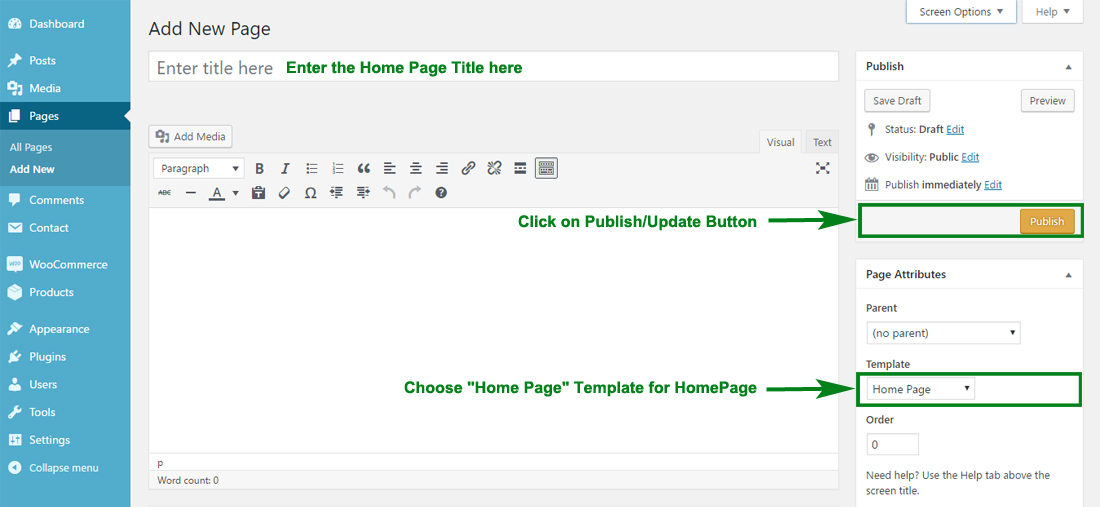
oStore Provides a "Home Page" template for your home page. Please follows these steps to configure your home page with "Home Page" Template.
Home Page Setting
- Log into your WordPress site and opens the Admin Panel.
- Go to Dashboard > Pages > Add New
- Enter the Page Title for the Page. You do not require to enter anything in the content section for creating a Enable Home Page pag
- Select the Home Page Template from the Page Attributes section.
- Click Publish
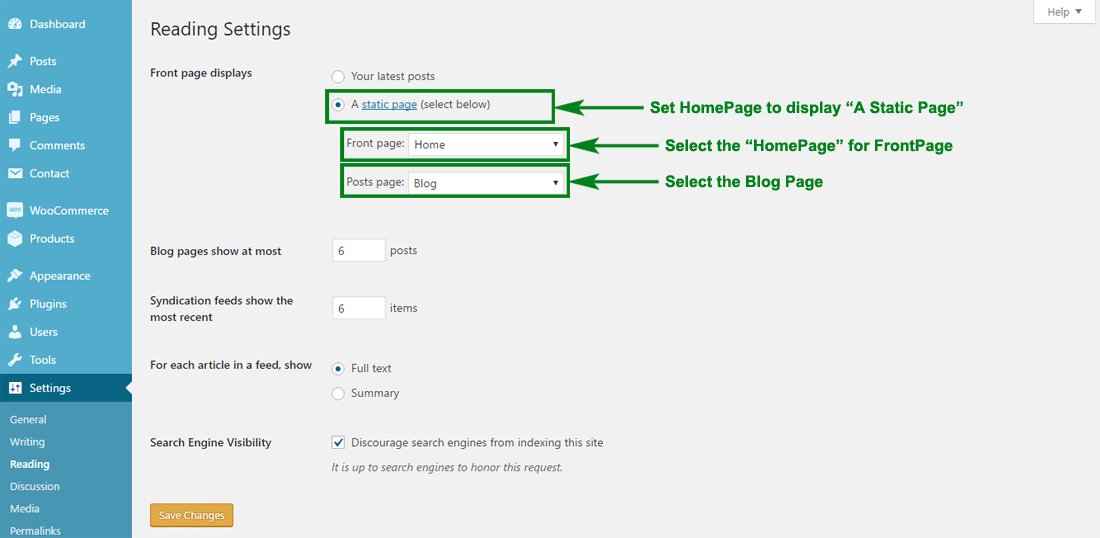
Configuring the Front Page display setting
- Log into your WordPress site and opens the Admin Panel.
- Go to Appearance > Customize > Static Front Page.
- Select A static page under Front Page displays.
- Click Save & Publish.
Note : Remember that oStore WooCommerce themes fully base on Widget so first configer home page using a widget.
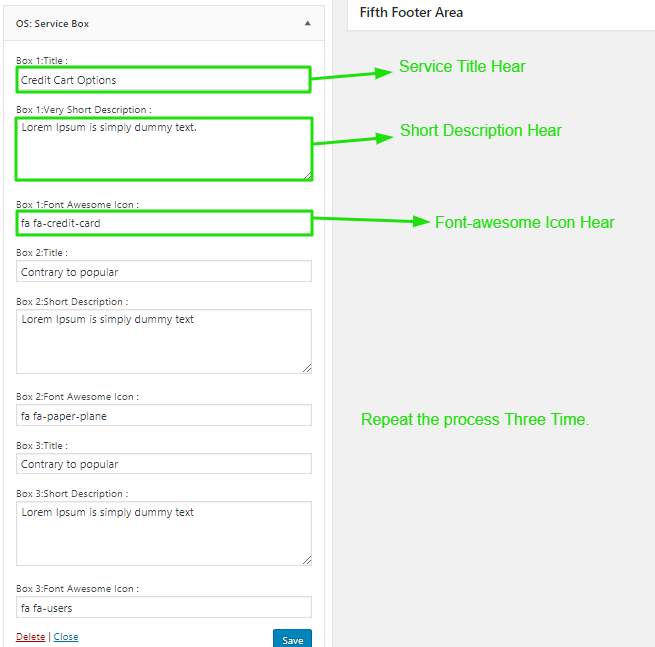
Services Section

Configure Services Section
- Log into your WordPress site and opens the Admin Panel.
- Go to Dashboard > Appearance > Widgets
- Open > Widgets > Home Page Widget Area
- Open > Home Page Widget Area > Drag & Drop "OS: Service Box" & Manage all settings Service Area in Widget Options Per as you Want
- Click Save > Publish.
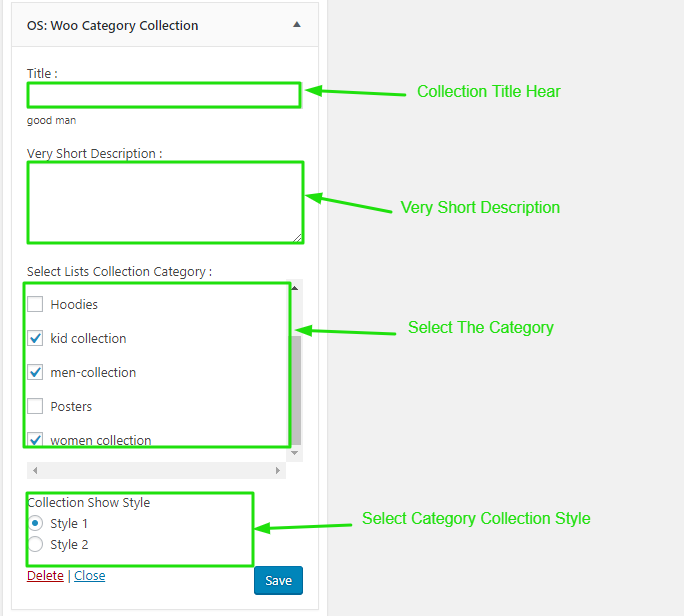
WooCommerce Category Collection
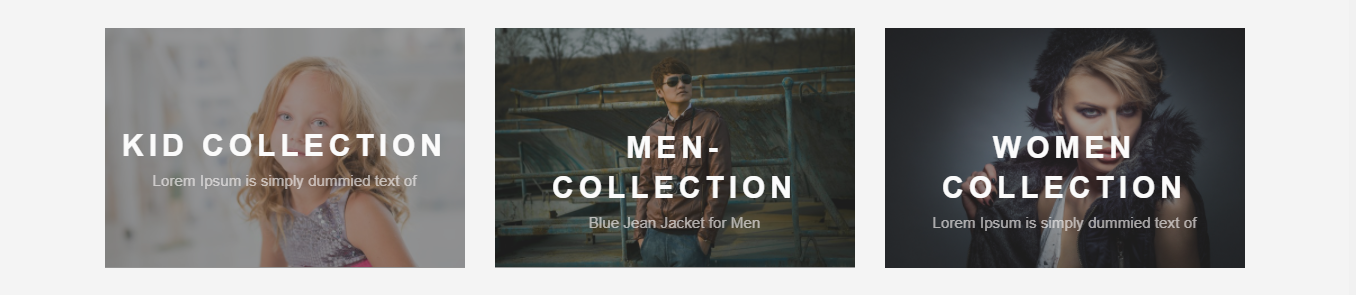
Configure WooCommerce Category Collection
- Log into your WordPress site and opens the Admin Panel.
- Go to Dashboard > Appearance > Widgets
- Open > Widgets > HomePage Widget Area
- Open > HomePage Widget Area > Drag & Drop "OS: Woo Category Collection" & Manage WooCommerce Category Collection Options Per as you Want
- Click Save > Publish.
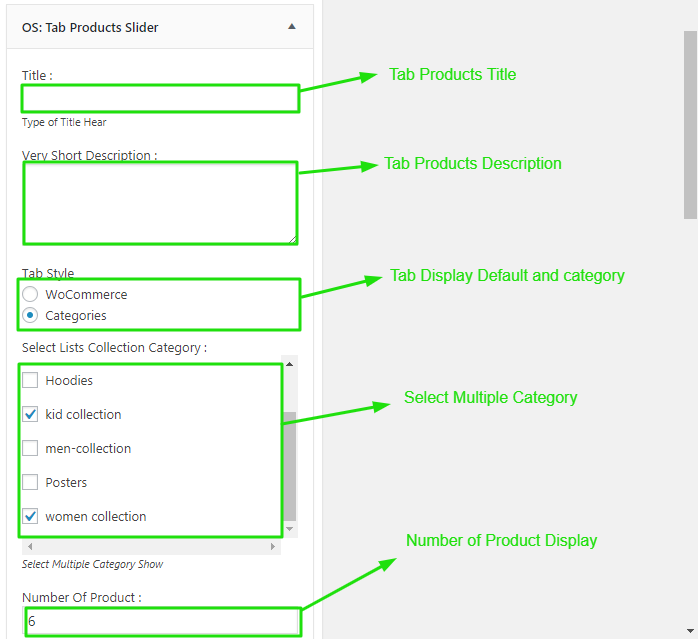
WooCommerce Category Tabs
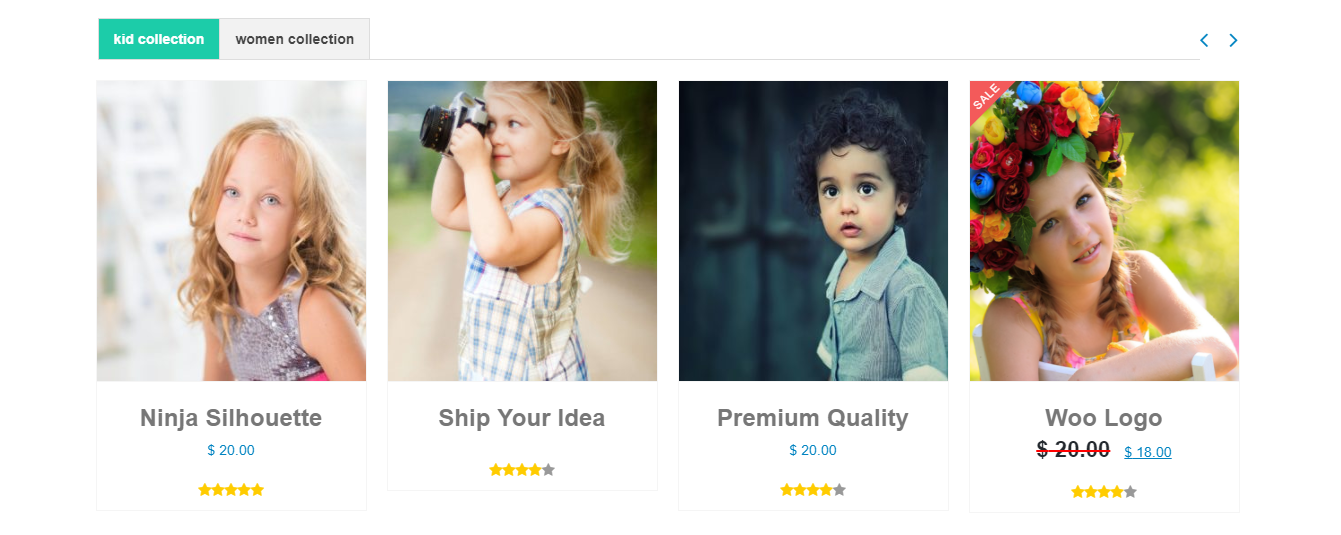
Configure WooCommerce Category Tabs
- Log into your WordPress site and opens the Admin Panel.
- Go to Dashboard > Appearance > Widgets
- Open > Widgets > HomePage Widget Area
- Open > HomePage Widget Area > Drag & Drop "OS: Tab Products Slider" & Manage WooCommerce Category Collection Tabs Options Per as you Want
- Click Save > Publish.
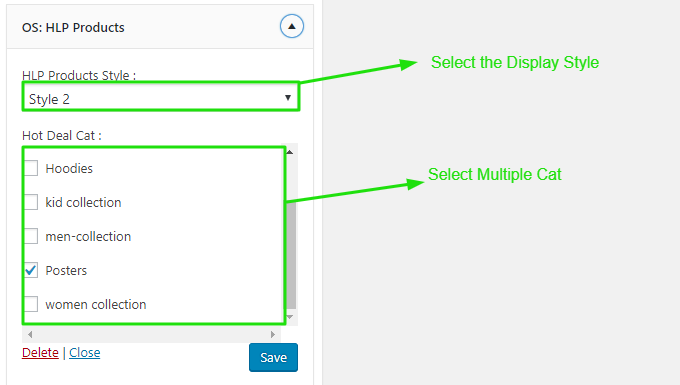
WooCommerce HLP Products (Hot Deal, Latest, Popular Products)
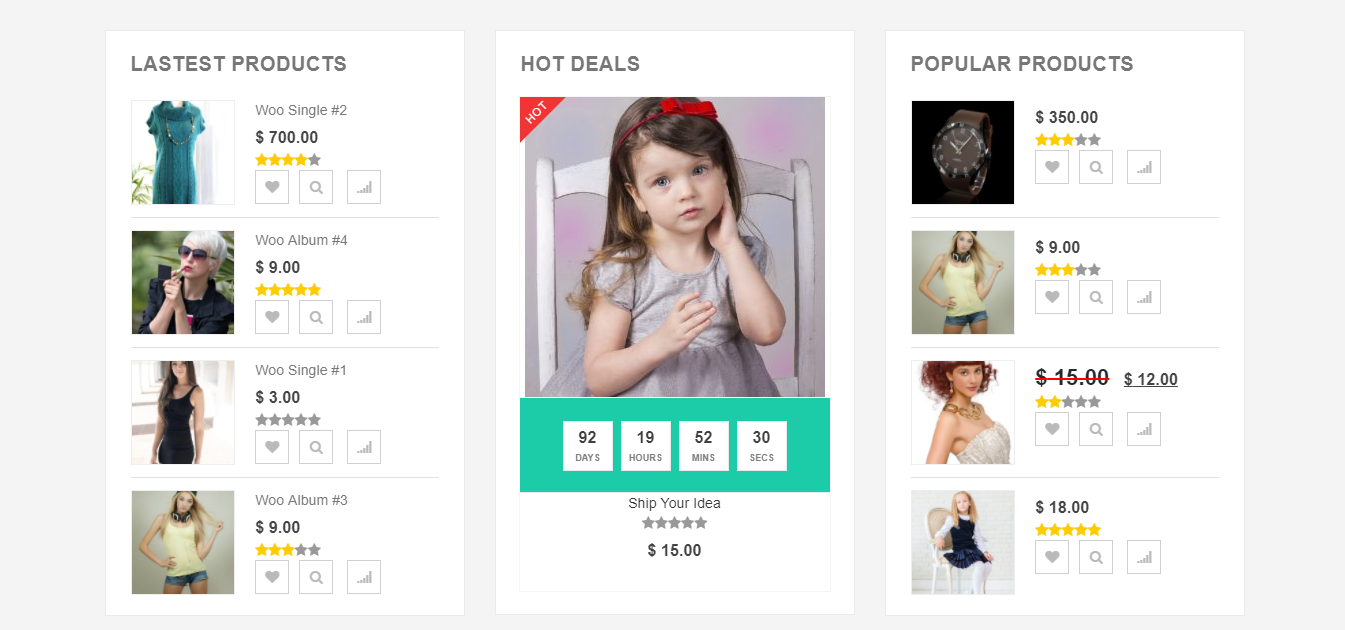
Configure WooCommerce HLP Products
- Log into your WordPress site and opens the Admin Panel.
- Go to Dashboard > Appearance > Widgets
- Open > Widgets > HomePage Widget Area
- Open > HomePage Widget Area > Drag & Drop "OS:HLP Products" & Manage woocommerce HLP Products Settings Options Per as you Want
- Click Save > Publish.
Note : Remember that Hot Deal Product Set (Products Schedule )
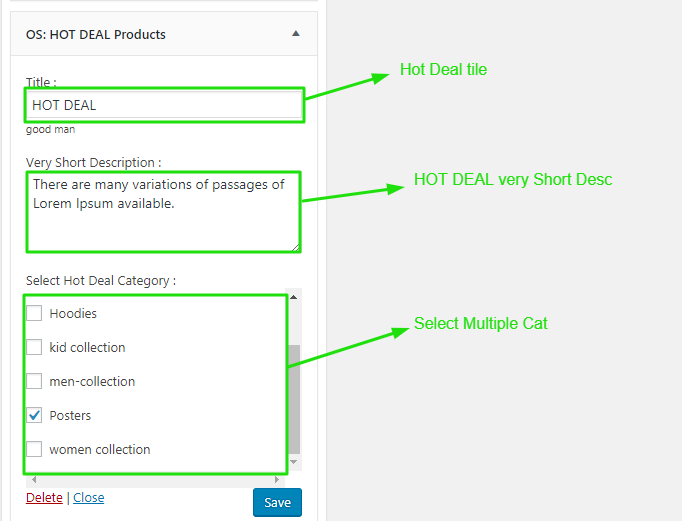
WooCommerce Hot Deal Products
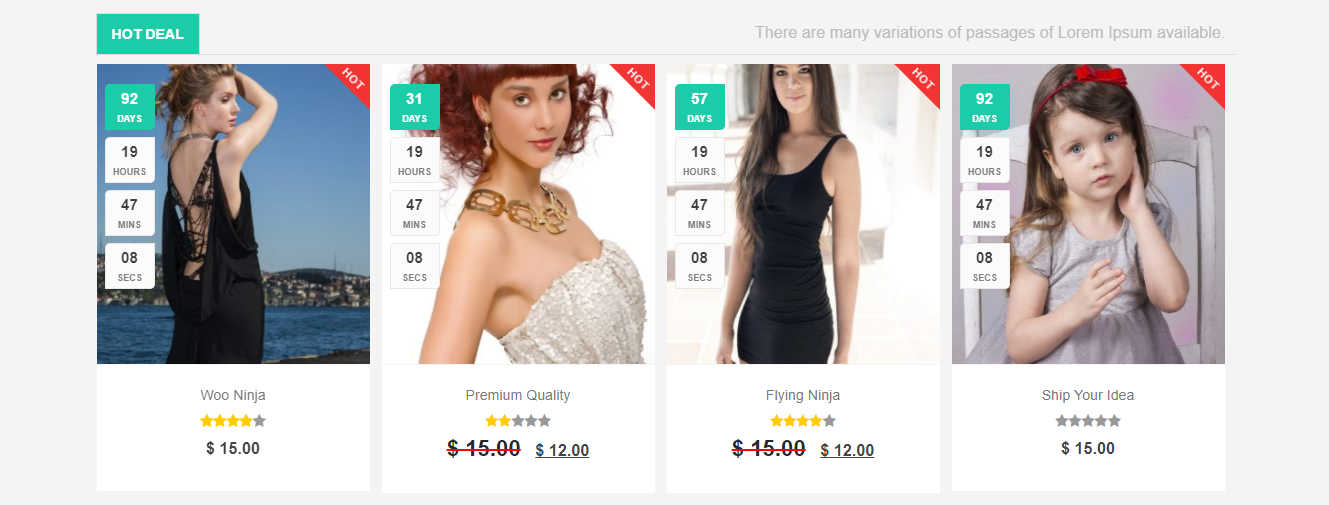
Note: Remember that Hot Deal Product Set (Products Schedule )
Configure WooCommerce Hot Deal Products
- Log into your WordPress site and opens the Admin Panel.
- Go to Dashboard > Appearance > Widgets
- Open > Widgets > HomePage Widget Area
- Open > HomePage Widget Area > Drag & Drop "OS: HOT DEAL Products" & Manage woocommerce HOT DEAL Products Settings Options Per as you Want
- Click Save > Publish.
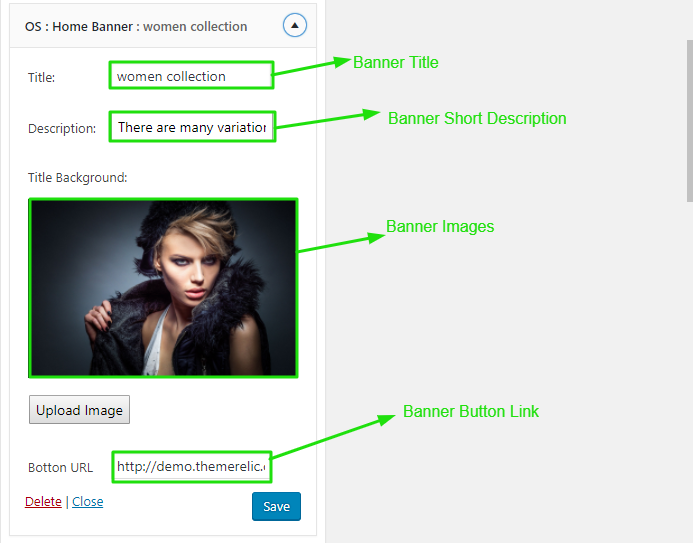
Home Page Banner

Configure Home Page Banner
- Log into your WordPress site and opens the Admin Panel.
- Go to Dashboard > Appearance > Widgets
- Open > Widgets > HomePage Widget Area
- Open > HomePage Widget Area > Drag & Drop "OS: Home Banner" & Manage Home Page Banner Settings Options Per as you Want
- Click Save > Publish.
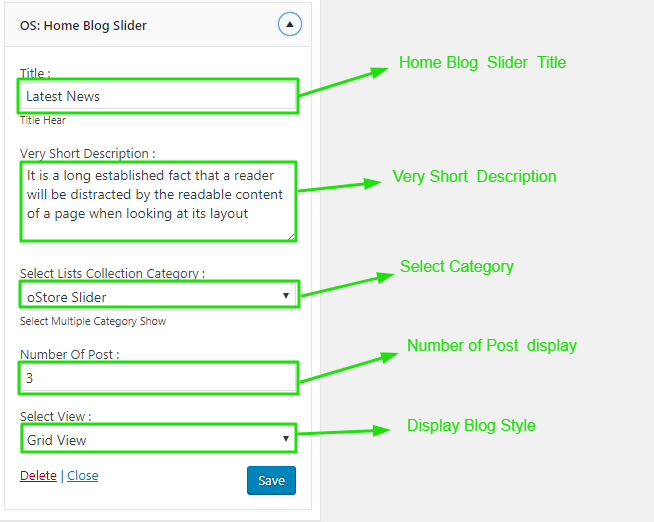
Home Blog Section
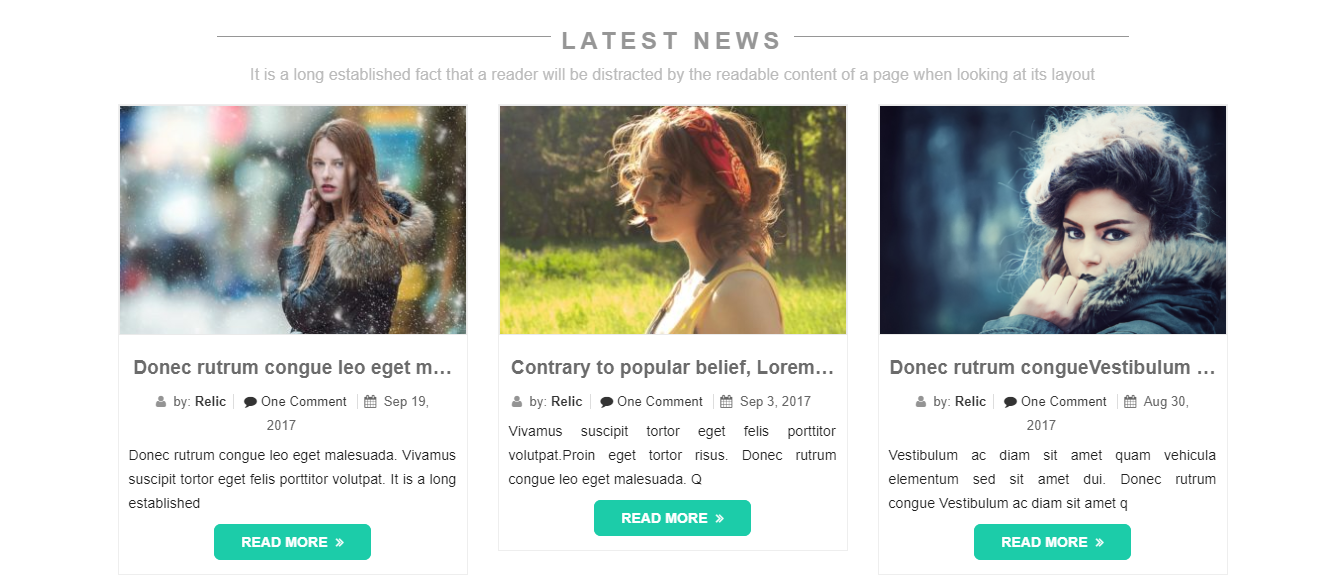
Configure Home Blog Section
- Log into your WordPress site and opens the Admin Panel.
- Go to Dashboard > Appearance > Widgets
- Open > Widgets > HomePage Widget Area
- Open > HomePage Widget Area > Drag & Drop "OS: Home Blog" & Manage Home Page Banner Settings Options Per as you Want
- Click Save > Publish.
Footer Settings
.png)
Social Links
Social Media Options
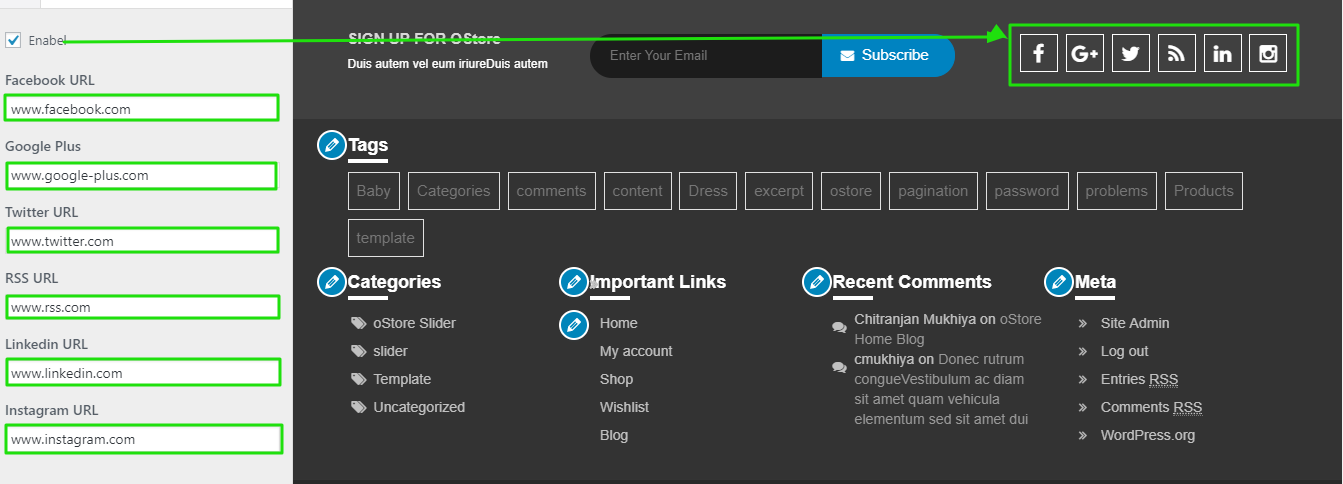
- Log into your WordPress site and opens the Admin Panel.
- Go to Dashboard > Appearance > Customize
- Open > Footer settings > Social Links
- Social Links > Manage all the options for social media link per as your want.
- Click Save > Publish.

Subscribe Form

- Log into your WordPress site and opens the Admin Panel.
- Go to Dashboard > Appearance > Customize > Footer Settings > Subscribe Section
- Enable The Mailchimp Footer Section
- Add Mailchimp Shortcode
- Add Text and Description
- Click Save > Publish.
Copyright Footer Social Links Option

- Log into your WordPress site and opens the Admin Panel.
- Go to Dashboard > Appearance > Customize > Footer Settings > Button Footer Section
- Enable The Mailchimp Footer Section
- Click Save > Publish.
Payment Logo Options

- Log into your WordPress site and opens the Admin Panel.
- Go to Dashboard > Appearance > Customize > Payment Logo
- Payment Enable Then
- Add Payment logo options
- Click Save > Publish.